How to Install a Wood Burning Stove in a Fireplace
Installing a wood-burning stove in an existing fireplace is a great way to enhance the efficiency of your home’s heating while preserving the charm of a traditional hearth. A wood-burning stove provides greater heat output compared to an open fireplace, and it’s also more environmentally friendly. This article will guide you through the process of installing a wood stove in a fireplace, covering everything from preparation to safety considerations.
For high-quality stoves, installation materials, and expert advice, you can rely on Caledonian Stoves. They offer a wide selection of products to make your wood-burning stove installation easier and safer.
Why Install a Wood-Burning Stove in a Fireplace?
Before diving into the Wood burning stove installation process, let’s take a look at some of the benefits of installing a wood-burning stove inside an existing fireplace.
- Enhanced Heating Efficiency: A wood-burning stove can increase heating efficiency by as much as 70% compared to an open fireplace. This is because stoves are designed to trap heat and allow better control of airflow, ensuring more heat is transferred into your home rather than up the chimney.
- Eco-Friendly: Burning wood is considered a carbon-neutral process. When sourced sustainably, the carbon dioxide released from burning wood is balanced by the carbon absorbed by trees during their growth.
- Reduced Heating Costs: Wood is often cheaper than other heating fuels like gas, oil, or electricity. A wood-burning stove allows you to heat your home more efficiently and reduce your reliance on expensive central heating systems.
- Safety: Wood-burning stoves are safer than open fireplaces because they contain the fire in an enclosed space. This reduces the risk of sparks or embers causing accidental fires in your home.
- Aesthetic Appeal: A wood-burning stove in a fireplace retains the traditional look of a hearth while adding a modern and efficient heating solution.
Step 1: Choose the Right Wood-Burning Stove
The first and most important step in the installation process is selecting the right wood-burning stove to fit your fireplace. Consider the following factors:
- Size of the Stove: Measure the opening of your fireplace to determine what size wood stove will fit inside. The stove should fit comfortably into the fireplace without being too large or too small. A stove that’s too large may cause overheating, while one that’s too small won’t produce enough heat.
- Heating Capacity: Choose a stove with the appropriate British Thermal Unit (BTU) output to heat your room. Larger rooms will need stoves with higher BTU ratings, while smaller rooms may require less heat.
- Efficiency Rating: Modern stoves come with efficiency ratings that indicate how well they convert wood into heat. Choose a stove with a high efficiency rating (usually above 70%) to get the most out of your fuel.
- Style: Wood-burning stoves come in a range of designs, from traditional cast-iron stoves to sleek, contemporary models. Choose one that fits the aesthetic of your room and fireplace.
If you’re not sure which stove is right for your fireplace, Caledonian Stoves offers a variety of high-quality options. Their experienced team can help you choose the perfect model based on your space and heating needs.
Step 2: Check Local Regulations and Permits
Before starting any installation, it’s essential to check local building codes and regulations. Wood-burning stove installations are subject to strict safety standards, so you’ll need to ensure that your project complies with local laws.
- Permits: Many municipalities require permits for wood-burning stove installations. These permits are designed to ensure that the installation meets fire safety standards and is done properly.
- Building Codes: Local building codes typically dictate how the stove must be installed, including requirements for ventilation, distance from combustible materials, and chimney height. You should also check if any modifications to the existing fireplace or chimney are needed.
- Post-Installation Inspections: In many areas, a post-installation inspection is required to certify that the stove has been installed correctly.
Caledonian Stoves can guide you through the regulatory process, helping you understand the necessary permits and ensuring your installation meets all local building codes.
Step 3: Inspect and Prepare the Chimney
Once you’ve selected your wood-burning stove and checked the local regulations, the next step is to inspect and prepare the existing chimney for the installation.
- Chimney Inspection: Have your chimney inspected by a certified chimney sweep or a professional installer to ensure it’s in good condition. A chimney that’s in poor repair or clogged with creosote can be a serious fire hazard. The inspection will also help determine whether your chimney requires any modifications before installation.
- Chimney Liner: Most wood stoves require a flue liner to improve draft efficiency and reduce the risk of creosote buildup. A stainless steel chimney liner is typically recommended as it’s durable and heat-resistant. The liner should be the correct size to ensure proper airflow, as an oversized or undersized liner can affect stove performance.
Caledonian Stoves provides high-quality chimney liners and can recommend the best options for your specific fireplace.
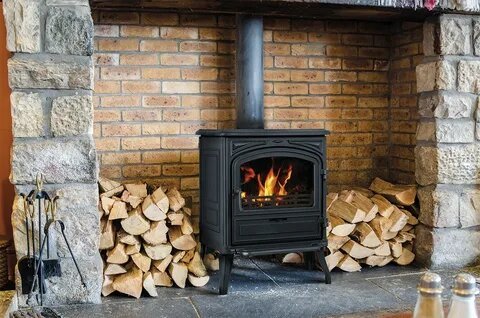
Step 4: Prepare the Hearth
The hearth is the non-combustible surface on which the wood stove will sit. It’s essential to ensure that your existing fireplace hearth meets safety requirements.
- Hearth Size: The hearth must extend at least 18 inches in front of the stove door and 12 inches on the sides. This ensures that any embers or sparks that escape won’t land on flammable materials like carpet or wood floors.
- Hearth Material: The hearth should be made from a non-combustible material like stone, brick, tile, or concrete. This protects the floor from the high temperatures generated by the stove.
If your existing hearth doesn’t meet these standards, you may need to extend or replace it. Caledonian Stoves offers a wide range of hearth materials to suit different styles and safety needs.
Step 5: Install the Wood-Burning Stove
Once the chimney and hearth are prepared, it’s time to install the wood stove in your fireplace. This is a job best left to a professional installer, but here’s an overview of what’s involved:
- Stovepipe Installation: The stovepipe connects the stove to the chimney or flue. It must be fitted securely to prevent smoke from leaking into your home. The stovepipe should be the same diameter as the stove’s flue collar and extend to the chimney liner.
- Sealing the Joints: All stovepipe joints must be sealed with a high-temperature sealant to prevent smoke from escaping into the room. This also improves the efficiency of the stove by ensuring that the heat is directed up the chimney.
- Positioning the Stove: The wood stove should be positioned correctly inside the fireplace, ensuring that it’s level and stable. Make sure to leave enough clearance around the stove to prevent overheating of nearby surfaces.
Caledonian Stoves can recommend certified installers to ensure the stove is installed safely and correctly.
Step 6: Install Smoke and Carbon Monoxide Detectors
Safety is paramount when installing a wood-burning stove. To protect your family, it’s essential to install both smoke and carbon monoxide detectors in the room where the stove is located.
- Smoke Detectors: Install smoke detectors on the ceiling, as smoke rises. Ensure they are in working order and test them regularly.
- Carbon Monoxide Detectors: Burning wood produces carbon monoxide, which is odorless and colorless but highly dangerous if it accumulates in enclosed spaces. Install carbon monoxide detectors at eye level and near the stove to detect any buildup of this gas.
Step 7: Test and Maintain the Stove
Once the installation is complete, it’s time to test the stove and ensure everything is working correctly.
- Test the Draft: Light a small fire using kindling and newspaper to test the chimney draft. If the smoke is drawn up the chimney without escaping into the room, the draft is working properly.
- Monitor Heat Output: Make sure the stove produces enough heat to warm the room without overheating. Adjust the airflow controls to regulate the temperature.
- Regular Maintenance: To keep your stove working efficiently, schedule regular chimney cleanings to remove creosote buildup. Inspect the stove, stovepipe, and chimney annually to ensure there are no leaks or blockages.
Caledonian Stoves offers a range of maintenance products, including chimney cleaning kits and replacement parts, to keep your stove in optimal condition.
Conclusion
Installing a wood-burning stove in an existing fireplace is an excellent way to improve your home’s heating efficiency while maintaining the charm of a traditional hearth. By following these steps, you can ensure a safe and efficient installation that provides warmth and comfort for years to come.
For the best wood-burning stoves, expert advice, and installation materials, visit Caledonian Stoves. Their extensive selection and knowledgeable staff make them the top choice for anyone looking to install a wood-burning stove in their home.
Read More: newstips