Craft Your Pyramid Gift Box: A 6-Step Guide – Packaging Mania
Do you want to impress your loved ones with amazing gifts, wrapped in unique and attractive packaging? Why don’t you go with custom pyramid boxes? These are stunning in design and durable in composition. The most interesting thing is that you can make these wonderful boxes yourself. Here is a simple six-step guide to help you design these packaging solutions. But first, explore what these boxes are:
Custom Pyramid Boxes: A Short Overview
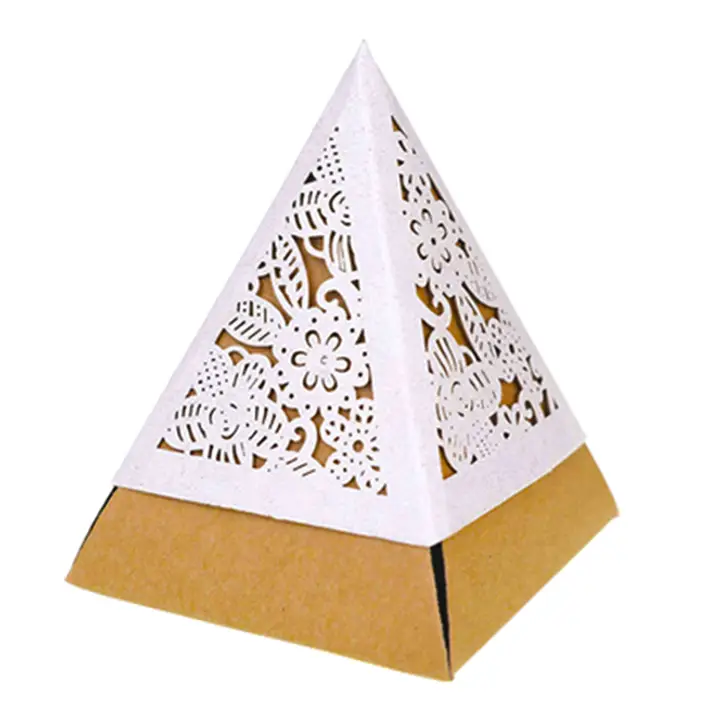
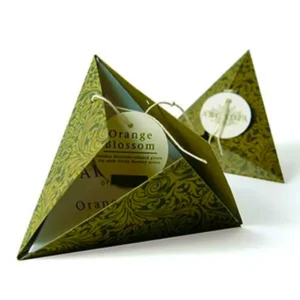
As the name indicates, these boxes are not of typical square or rectangular shape. They have a unique triangular base and four sides that converge to a point at the top. They are not just visually striking but functional as well. Sturdy cardboard and eco-friendly kraft paper are often used in their composition. Although they have a distinctive shape, they can be customized to hold various items. Usually, they are preferred for small gifts, jewelry, and decorative pieces.
Why Make a Pyramid Gift Box Yourself?
Nowadays, finding a ready-made pyramid box is not a big deal. The market brims with many professional suppliers who provide custom pyramid boxes at wholesale rates. Though you can easily get them, their DIY preparation is quite a fun and unique experience. It provides you with the opportunity to showcase your creativity at its best. From color selection to the design pattern, you can opt for the details that perfectly match the recipient’s personality. Moreover, crafting these boxes by hand is a cost-savvy option. You can use the materials already present at your home.
A 6-Step Quick Guide for DIY Pyramid Gift Boxes
Follow the simple steps given below and learn how to make pyramid boxes:
1- Collect all the Required Materials
First, make a list of all the essentials and ensure that you have all of them before you start working. You might need the following items to make custom pyramid boxes by yourself:
- A measuring ruler.
- A piece of a sturdy cardstock. You can also go with craft paper. The size of these materials depends on your needs.
- A pencil
- Scissors
- Glue or double-sided tape
- Stickers, ribbons, markers, or any other decorative item that you like.
Vital Tip
If you are trying the DIY pyramid box for the first time, then you are suggested to start with a small-sized box. It is easier to make than bigger boxes.
2- Create the Template for the Box
When you have all the required materials, start drawing a blueprint for your pyramid box. Here are easy steps that can help you in creating the template:
- Take out cardstock and place it straight on a flat surface.
- Draw a square at its center with the help of a ruler and pencil. Make sure the square is of right size because it will form the base of your pyramid.
- After this, draw an equilateral triangle from each side of the square. This way, you will get four equal triangles attached to the square.
- Take one triangle and add a small tab on its left side. This will help to glue the pyramid together.
Essential Tip
Carefully take all the measurements. Make sure the lines are straight and the triangles are equal in size. If they are not, the pyramid won’t fit together properly, leading to an unstable structure. Therefore, pay immense heed to the accuracy of the process.
3- Cut Out the Design
When you are ready with the template, grab the scissors and carefully cut along the lines of the shape you have just sketched. Cut slowly and precisely to ensure the edges are crisp and even. Remember, rough or jagged edges can affect the final look of your project. Once, you have neatly trimmed the main shape, carefully snip out the small tab as well. This piece will play a vital role in putting the pyramids together.
4- Fold the Edges
Next, you have to fold the design along all the lines you have drawn. Start by creasing the edges of the square and then move to the lines forming each triangle. Be sure to fold all these lines inward. This ensures all the pencil marks remain on the inside of the pyramid shape. Remember, proper folding is very important, as these creases will define the final look of your pyramid. If you want to make the folds crisp and straight, use a ruler and press it gently against the folds to make sharp and neat edges.
5- Put the Pyramids Together
It is the point where your box starts getting its shape. Follow the steps given below and bring life to your box:
- First, pick a small tab on one of the triangular flaps and coat it with a thin layer of glue. You can also apply a double-sided tape to it.
- Then gently fold the adjacent triangle over the tab. Make sure they evenly meet each other.
- Press the tab and triangle to strengthen the bond. Hold for a few seconds to secure the connection.
- Then, lift and align the remaining triangles, forming a pyramid structure.
- If you feel the need for extra reinforcement, then apply some more glue or tape to the inner seams.
- Keep in mind to leave the base open so you can place your gift inside later.
6- Adorn your Pyramid Box
This is the most fun part of creating a pyramid gift box. At this point, you can unleash your creativity. Here are some ways to embellish these unique boxes and make them special:
- Wrap colorful ribbons around each side of the pyramid, crisscrossing them at the apex. You can also attach lace trims along the edges of the pyramid. This usually works best for romantic or vintage-themed gifts.
- You can also use watercolors to create abstract washes or floral designs on the box’s surface. These soft, blended hues add an artistic flair to the pyramid box.
- Geometric shapes or metallic accents in gold or silver can help you create a modern and chick look for the gift box.
- Craft small paper flowers and glue them to the sides or the top of the pyramid. You can cluster them together for a fuller effect.
- If you want to add some lively touch then add tiny colorful pom-poms around the edges or at the peak.
- Drape delicate beaded strings around the pyramid to an elegant touch to the packaging.
Now your pyramid box is almost ready. Place the gift inside before you seal it. Once, the present is in the box, bring the base flaps together. You can either shut them with glue or a double-sided tape. If you want to make it easy for the recipient to open, consider using a decorative sticker.
Indeed, creating a pyramid gift box by yourself is a fun-filled process. But if you need them in bulk for your retail or home-based business, you can get these amazing boxes from suppliers as well. Packaging Mania, one of the best packaging suppliers in the USA, provides you with personalized pyramid boxes at wholesale rates. Contact them today to get striking packaging that can stun your loved ones.